First experiences with windows 7 rc

The good news is that most of the common used software works. So far i install only the necessary software for such a netbook. No video editing, development tools, ide,…

Software which works

Flash under IE8 work only with a trick. The direct download or installation from adobe.com does not work. Via PCWelt is the install exe as well available. Save the file and start the installation. Et voila.

The Samsung has no built in bluetooth device. I bought a ultra small usb Trust bluetooth 2.1 adapter. Windows 7 RC recognize most but not all functionality. The broadcom driver for Vista works perfect. After that i can install the Nokia PC Suite 7.1 and access my Nokia N95 successfully.

Windows 7 RC on Samsung NC10

The Samsung netbook shipped with pre installed Windows XP and 1GB RAM. After upgrading to 2GB RAM and good tests of Windows 7 RC under Virtualbox and VMware i feel safe to install Windows 7 RC. I made under the running XP all available updates including bios firmware. My RAM dealer told me about a other customer with non bootable netbook after upgrading under windows 7. You need a USB Stick to extract the iso to it and boot from it like described here. Reboot the netbook and press F2 to enter the BIOS for changing the boot order. Push the “USB HDD” over the internal HDD and press F10 for “save and exit”. Insert the stick and enter the setup of windows 7 RC. The installation works perfect and nearly all hardware works out of the box. Windows update updates the lan,wlan and graphics driver. My netbook has a built in UTMS modem which is not recognized out of the box. Under XP are two possibility to establish HSPDA connections with the internal UMTS modem: Vodafone Dashboard or the Samsung Connectionmanager. I tried from samsung.de the XP version with no luck. The polish Samsung website has a newer working version. Another problem was the touchpad. Windows recognize only a PS/2 mouse… The vista driver from the synaptic download site works well. Good first place to look is the “troubleshoot compatibility” entry in context menu of each executeable. Set their the requirement to use Admin rights and Vista or XP (in that order) compatibility. The connectionmanager works only with Vista OS and Admin rights settings. WLAN at home was no problem. No jumps or quirks has to be done to establish a WPA2 AES connection.

I use AVG Antivir Free edition as antivirus solution. The newly maintenance center offers online a page with working products. Microsoft links directly to AVG Antivirus. AVG Antivir Free works as well with the limitation that windows is not informed about the state of virus definitions. You can disable this additional check inside the maintenance center to avoid further warnings about a maybe outdated antivirus solution. I tried inside Virtualbox Kapersky as trial which has a perfect integration.

Windows 7 RC compared to Vista is much faster. Even on a netbook will the Aero extension work. Other programs or windows get a glass l&f if you swith with the tab key through the runnning programs. The taskbar shows the running IE 8 including the possibility to navigate directly to the open tabs. Download progress is shown as a green filling taskbar icon.

Most software seems to run like Office 2003, Notepad++, 7-Zip or firefox.

Overall is the Samsung NC10 a good choice as netbook with the non glare display and the long running battery with 3-4h capicity.

Howto setup a OpenLDAP Server for Ubuntu 8.10

Most enterprises use LDAP as interface to their company structure database. In the Microsoft world is Active Directory the implementation for LDAP. Under Linux is OpenLDAP the common choice for admins. Such LDAP directories are tree based. OpenLDAP is the reference implementation for LDAP v3.

The JNDI API inside the Java SDK is usable as implementation to access such LDAP directories. With Spring LDAP is more sophisticated API available.

My first code sample works in the company against their OpenLDAP server. For security reasons is the access not possible from outside. So my JUNIT Tests was code red after running in my homeoffice. Maven standard is to run all test prior to build a package like a J2EE war or ear file. So i decided to setup a OpenLDAP server inside my ubuntu 8.10 server vmware server vm.

First step is to retrieve and install the openldap package as root:

  • sudo su –
  • apt-get install slapd ldap-utils nmap php5-ldap db4.2-util

You have to set a password during installation for the OpenLDAP server. Keep that in mind!
Now run the configuration assistant:

  • dpkg-reconfigure slapd

Wizard steps:

  1. omit openldap server configuration? – no
  2. dns domain name? vm.example.org
  3. organization name? myCompany
  4. database backend to use? hdb
  5. do you want the database to be removed when slapd is purged? yes
  6. may be the question: move old database? yes
  7. administrator password? the same one as entered during installation
  8. confirm password? see last step
  9. allow LDAPv2 protocol? no

Now edit the /etc/ldap/ldap.conf file for the client side configuration:

ldap_version 3
URI ldap://localhost:389
SIZELIMIT 0
TIMELIMIT 0
DEREF never
BASE dc=vm,dc=example, dc=org

With the command “ldapsearch -x” you should see the following output:

# extended LDIF
#
# LDAPv3
# base  (default) with scope subtree
# filter: (objectclass=*)
# requesting: ALL
#

# vm.example.org
dn: dc=vm,dc=example,dc=org
objectClass: top
objectClass: dcObject
objectClass: organization
o: myCompany
dc: vm

# admin, vm.example.org
dn: cn=admin,dc=vm,dc=example,dc=org
objectClass: simpleSecurityObject
objectClass: organizationalRole
cn: admin
description: LDAP administrator

# search result
search: 2
result: 0 Success

# numResponses: 3
# numEntries: 2

For easier admininstration exist a php admin ui called phpldapadmin and can be installed with:

  • apt-get install phpldapadmin
  • ln -s /usr/share/phpldapadmin/ /var/www/phpldapadmin

Open now the config file /etc/phpldapadmin/config.php with joe (a editor) and change the line with the ldap node info to:


/* Array of base DNs of your LDAP server. Leave this blank to have phpLDAPadmin
   auto-detect it for you. */
$ldapservers->SetValue($i,'server','base',array('dc=vm,dc=example,dc=org'));
...
$ldapservers->SetValue($i,'login','dn','cn=admin,dc=vm,dc=example,dc=org');

Check your PHP5 memory settings in /etc/php5/apache2/php.ini:

memory_limit = 64M      ; Maximum amount of memory a script may consume (16MB)

Restart the apache to use this changed configuration

  • /etc/init.d/apache2 restart

and go to:

http://your.vm.ip/phpldapadmin

Click on the login link on the left side and enter as “login dn”:

  • cn=admin,dc=vm,dc=example,dc=org

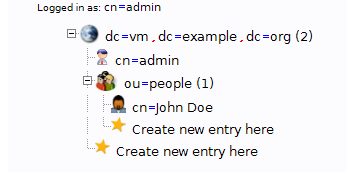
and your password in mind. First step is now to enter a “organisational unit”:

  • click on the left side on the link beside the world icon “dc=vm…”
  • click on “create a child entry here”
  • choose “organisational unit” as template
  • enter “people” and click on “create object”
  • click on this new orginsational unit people in the tree
  • click on “create a child entry here”
  • choose “Address Book Entry (mozillaOrgPerson)” as template
  • enter “John” as “first name”
  • enter “Doe” as “last name”
  • go to common name (cn) and enter “John Doe”
  • click on “create object”

Now check with “ldapsearch -x” if everything is ok:

# extended LDIF
#
# LDAPv3
# base  (default) with scope subtree
# filter: (objectclass=*)
# requesting: ALL
#

# vm.example.org
dn: dc=vm,dc=example,dc=org
objectClass: top
objectClass: dcObject
objectClass: organization
o: myCompany
dc: vm

# admin, vm.example.org
dn: cn=admin,dc=vm,dc=example,dc=org
objectClass: simpleSecurityObject
objectClass: organizationalRole
cn: admin
description: LDAP administrator

# people, vm.example.org
dn: ou=people,dc=vm,dc=example,dc=org
objectClass: organizationalUnit
objectClass: top
ou: people

# John Doe, people, vm.example.org
dn: cn=John Doe,ou=people,dc=vm,dc=example,dc=org
objectClass: inetOrgPerson
objectClass: top
givenName: John
sn: Doe
cn: John Doe

# search result
search: 2
result: 0 Success

# numResponses: 5
# numEntries: 4

Your LDAP server is now running and you can easily configure it inside your favorite browser

LDAP Tree

Dbunit with JUnit 4.x and Spring for testing Oracle DB Application

DBUnit is very nice for testing database content changes made by an application. You define in XML the data including the structure of your tables (dataset.xml).


Simple_Data is the name of the table and each column is a attribute in the xml doc with the content value e.g. id with value 1.

The Getting Started of DBUnit work with JUnit 3.8 and self handling of the JDBC Connection.

JUnit 4.x are more comfortable with annotations based test methods and Spring comes with dependency injection for separating
configuration from implementation code.

The following approach combines DBUnit with JUnit 4.4 and Spring 2.5.6 to test comfortable a Oracle 10g database.

I use Maven 2.x to define the depending libraries used by the example (pom.xml):


	4.0.0
	de.schaeftlein.dev.dbunit
	test-dbunit
	test-dbunit
	0.0.1-SNAPSHOT


			org.dbunit
			dbunit
			2.4.2
		
		
			org.springframework
			spring
			2.5.6
			jar
			compile
		
		
			junit
			junit
			4.4
		
		
			commons-dbcp
			commons-dbcp
			1.2.2
		
		
			org.springframework
			spring-test
			2.5.6
		
		
			org.slf4j
			slf4j-api
			1.5.6
		
		
			org.slf4j
			log4j-over-slf4j
			1.5.6
		
		
			log4j
			log4j
			1.2.14
		
		
			org.slf4j
			slf4j-log4j12
			1.5.6
		
		
			com.oracle
			ojdbc14
			10.2.0.2.0


Keep in mind that the Oracle JDBC Driver has to be downloaded manually.
The public maven repos include only the Pom definition for the oracle driver. Generate with maven command line tool the eclipse project files:

mvn clean eclipse:clean eclipse:eclipse

The JDBC datasource is defined via Spring (applicationContext.xml):


Additionally we define the expected data as well in XML for DBUnit (expectedDataSet.xml):


Now we can code our JUnit 4.x Test to

  1. load data before the test method
  2. change the data via JDBC to emulate a application
  3. compare the changed data with expected data
  4. clean up the database

@RunWith(SpringJUnit4ClassRunner.class)
@ContextConfiguration(locations={"classpath:applicationContext.xml"}) 
public class TestDBUnitWithSpring {

	@Autowired
	private DataSource dataSource;
	
	@Before
	public void init() throws Exception{
		// insert data into db
		DatabaseOperation.CLEAN_INSERT.execute(getConnection(), getDataSet());
	}
	
	@After
	public void after() throws Exception{
		// insert data into db
		DatabaseOperation.DELETE_ALL.execute(getConnection(), getDataSet());
	}
	
	private IDatabaseConnection getConnection() throws Exception{
	// get connection
		Connection con = dataSource.getConnection();
		DatabaseMetaData  databaseMetaData = con.getMetaData();
		// oracle schema name is the user name
		IDatabaseConnection connection = new DatabaseConnection(con,databaseMetaData.getUserName().toUpperCase());
		DatabaseConfig config = connection.getConfig();
		// oracle 10g 
		config.setProperty(DatabaseConfig.PROPERTY_DATATYPE_FACTORY, new Oracle10DataTypeFactory());
		// receycle bin
		config.setFeature(DatabaseConfig.FEATURE_SKIP_ORACLE_RECYCLEBIN_TABLES, Boolean.TRUE);
		return connection;
	}
	
	private IDataSet getDataSet() throws Exception{
		// get insert data
		File file = new File("src/test/resources/dataset.xml");
		return new FlatXmlDataSet(file);
	}
	
	@Test
	public void testSQLUpdate() throws Exception{
		Connection con = dataSource.getConnection();
		Statement stmt = con.createStatement();
		// get current data
		ResultSet rst = stmt.executeQuery("select * from simple_data where id = 1");
		if(rst.next()){
			// from dataset.xml
			assertEquals("value_before", rst.getString("content"));
			rst.close();
			
			// update via sql
			int count = stmt.executeUpdate("update simple_data set content='value_after' where id=1");

			stmt.close();
			con.close();

			// expect only one row to be updated
			assertEquals("one row should be updated", 1, count);

			// Fetch database data after executing the code
			QueryDataSet databaseSet = new QueryDataSet(getConnection());
			// filter data
			databaseSet.addTable("simple_data", "select * from simple_data where id = 1");
			ITable actualTable = databaseSet.getTables()[0];

			// Load expected data from an XML dataset
			IDataSet expectedDataSet = new FlatXmlDataSet(new File("src/test/resources/expectedDataSet.xml"));
			ITable expectedTable = expectedDataSet.getTable("simple_data");

			// filter unnecessary columns of current data by xml definition
			actualTable = DefaultColumnFilter.includedColumnsTable(actualTable, expectedTable.getTableMetaData().getColumns());

			// Assert actual database table match expected table
			assertEquals(1,expectedTable.getRowCount());
			assertEquals(expectedTable.getRowCount(), actualTable.getRowCount());
			assertEquals(expectedTable.getValue(0, "content"), actualTable.getValue(0, "content"));
			
		} else {
			fail("no rows");
			rst.close();
			stmt.close();
			con.close();
		}

	}
}

OC4J and JAXP Parser conflicts

´The Oracle OC4J is based on the Orion Application Server source and still has some problems from the origin. I tested to deploy a little Apache CXF Annotation based Webservice into OC4J 10.1.3.4.0 with Eclipse WTP. Add in the Servers view a new local server from type “Oracle OC4J Standalone Server 10.1.3.n” and add the Web Application to this new J2EE container. When i start the server i got:

org.springframework.beans.factory.BeanCreationException: Error creating bean with name 'org.apache.cxf.wsdl.WSDLManager' defined in class path resource [META-INF/cxf/cxf.xml]: Instantiation of bean failed; nested exception is org.springframework.beans.BeanInstantiationException: Could not instantiate bean class [org.apache.cxf.wsdl11.WSDLManagerImpl]: Constructor threw exception; nested exception is java.lang.ClassCastException: oracle.xml.parser.v2.DTD cannot be cast to org.w3c.dom.Element
Caused by: org.springframework.beans.BeanInstantiationException: Could not instantiate bean class [org.apache.cxf.wsdl11.WSDLManagerImpl]: Constructor threw exception; nested exception is java.lang.ClassCastException: oracle.xml.parser.v2.DTD cannot be cast to org.w3c.dom.Element
Caused by: java.lang.ClassCastException: oracle.xml.parser.v2.DTD cannot be cast to org.w3c.dom.Element
	at java.util.XMLUtils.load(XMLUtils.java:61)
	at java.util.Properties.loadFromXML(Properties.java:852)
	at org.apache.cxf.common.util.PropertiesLoaderUtils.loadAllProperties(PropertiesLoaderUtils.java:71)
	at org.apache.cxf.wsdl11.WSDLManagerImpl.registerInitialExtensions(WSDLManagerImpl.java:226)
	at org.apache.cxf.wsdl11.WSDLManagerImpl.registerInitialExtensions(WSDLManagerImpl.java:221)
	at org.apache.cxf.wsdl11.WSDLManagerImpl.(WSDLManagerImpl.java:110)

XML Parsing is done in Java based applications by a JAXP compliant Parser. The first Parser in the classpath sequence of jars wins and is used by all java classes of a application. Default for OC4J is to provide the Oracle XML Parser, which is a bit old. The solution is to force OC4J to use my JAXP Parser instead of the container Default Parser defined in the shared libraries.

My CXF Web Project is maven based. First thing to do is to add a new maven dependency to xerces 2.9.1 as JAXP Parser to use for CXF.

		
			apache-xerces
			xercesImpl
			2.9.1
			jar
			compile
		

So create with ‘mvn package’ a war file in the target directory.

I removed the CXF Application from the OC4J Container inside the servers view in eclipse and start the OC4J server. Now log in the admin web console with

http://localhost:8888/em/console/ias/oc4j/home

Go to Applications and click on the deploy button. Select on the first screen the WAR file as local archive location. Enter on the second screen a application name and change the context path to your needs. Click on the third screen on the link to change your class loading. Remove all imported shared libraries and click on the checkbox below for “Search first locally for classes”. Click ok to go back to the third screen and click on deploy to start progress. Now it will successfully start the Application and you can see e.g. all deployed webservices with

http://localhost:8888/cxf-sample/

Keep in mind to adopt the context path “cxf-sample” of the url to your needs.

tech stuff, development news…